Compatibility
As of version 0.3, the minimum version of Gradle that is supported by Grolifant is 2.8.
Bootstrapping
The library is available on JCenter. Add the following to your Gradle build script to use it.
repositories {
  jcenter()
}dependencies {
compile 'org.ysb33r.gradle:grolifant:0.4'
}Distribution Installer
There are quite a number of occasions where it would be useful to download various versions SDK or distributions from a variety of sources and then install them locally without having to affect the environment of a user. The Gradle Wrapper is already a good example of this. Obviously it would be good if one could also utilise otehr solutions that manage distributions and SDKs on a per-user basis such as the excellent SDKMAN!.
The AbstractDistributionInstaller abstract class provides the base for plugin developers to add such functionality to their plugins without too much trouble.
Getting started
class TestInstaller extends AbstractDistributionInstaller {
        static final String DISTPATH = 'foo/bar'
        static final String DISTVER  = '0.1'

        TestInstaller(Project project) {
            super('Test Distribution',DISTVER,DISTPATH,project) (1)
        }

        @Override
        URI uriFromVersion(String version) { (2)
            TESTDIST_DIR.toURI().resolve("testdist-${DISTVER}.zip") (3)
        }
}| 1 | The installer needs to be provided with a human-readable name, the version of the distribution, a relative path below the installation for installing this type of distribution and a reference to an exiting Gradle Project instance. |
| 2 | The uriFromVersion method is used to returned an appropriate URI where to download the specific version of distribution from. Supported protocols are all those supported by Gradle Wrapper and includes file, http(s) and ftp. |
| 3 | Use code appropriate to your specific distribution to calculate the URI. |
The download is invoked by calling the getDistributionRoot method.
The above example uses Groovy to implement an installer class, but you can use Java, Kotlin or any other JVM-language that works for writing Gradle plugins.
How it works
When getDistributionRoot is called, it effectively uses the following logic
File location = locateDistributionInCustomLocation(distributionVersion) (1)

if(location == null && this.sdkManCandidateName)  { (2)
    location = getDistFromSdkMan()
}

location ?: getDistFromCache() (3)| 1 | If a custom location location is specified, look there first for the specific version |
| 2 | If SDKMAN! has been enabled, look if it has an available distribution. |
| 3 | Try to get it from cache. If not in cache try to download it. |
Marking files executable
Files in some distributed archives are platform-agnostic and it is necessary to mark specific files as executable after unpacking. The addExecPattern method can be used for this purpose.
TestInstaller installer = new TestInstaller(project)
installer.addExecPattern '**/*.sh' (1)| 1 | Assuming the TestInstaller from Getting Started, this example will mark all shell files in the distribution as executable once the archive has been unpacked. |
Patterns are ANT-style patterns as is common in a number of Gradle APIs.
Search in custom locations
The locateDistributionInCustomLocation method can be used for setting up a search in specific locations.
For example a person implementing a Ceylon language plugin might want to look in the ~/.ceylon folder for an existing installation of a specific version.
This optional implementation is completely left up to the plugin author as it will be very specific to a distribution. The method should return null if nothing was found.
Changing the download and unpack root location
By default downloaded distributons will be placed in a subfolder below the Gradle user home directory as specified during construction time. It is possible, especially for testing purposes, to use a root folder other than Gradle user home by setting the downloadRoot
Utilising SDKMAN!
SDKMAN! is a very useful local SDK installation and management tool and when specific SDKs or distributions are already supported it makes sense to re-use them in order to save on download time.
All that is required is to provide the SDKMAN! candidate name using the setSdkManCandidateName method.
installer.sdkManCandidateName = 'ceylon' (1)| 1 | Sets the candidate name for a distribution as it will be known to SDKMAN!. In this example the Ceylon language distribution is used. |
Checksum
By default the installer will not check any values, but calling setChecksum will force the installer to perform a check after downloading and before unpacking. It is possible to invoke a behavioural change by overriding verification.
TestInstaller installer = new TestInstaller(project)
installer.checksum = 'b1741e3d2a3f7047d041c79d018cf55286d1168fd6f0533e7fae897478abcdef' (1)| 1 | Provide SHA-256 checksum string |
Only SHA-256 checksums are supported. if you need something else you will need to override verification and provide your own checksum test.
Advanced: Override unpacking
By default, AbstractDistributionInstaller already knows how to unpack ZIPs and TARs of a varierty of compressions. If something else is required, then the unpack method can be overridden.
This is the approach to follow if you need support for unpacking MSIs. There is a helper method called unpackMSI which will install and then call the lessmsi utility with the correct parameters. In order to use this in a practical way it is better to override the unpack method and call it from there. For example:
@Override
protected void unpack(File srcArchive, File destDir) {
    if(srcArchive.name.endsWith('.msi')) {
        unpackMSI(srcArchive,destDir,[:])  (1)

        // Add additional file and directory manipulation here if needed

    } else {
        super.unpack(srcArchive, destDir)
    }
}| 1 | The third parameter can be used to set up a special environment for lessmsi if needed. |
Advanced: Override verification
Verification of a downloaded distribution occurs in two parts:
-
If a checksum is supplied, the downloaded archive is validated against the checksum. The standard implementation will only check SHA-256 checksums.
-
The unpacked distribution is then checked for sanity. In the default implementation this is simply to check that only one directory was unpacked below the distribution directory. The latter is effectively just replicating the Gradle Wrapper behaviour.
Once again it is possible to customise this behaviour if your distribution have different needs. In this case there are two protected methods than can be overridden:
-
verifyDownloadChecksum - Override this method to take care of handling checksums. The method, when called, will be passed the URI where the distribution was downlaoded from, the location of the archive on the filesystem and the expected checksum. It is possible to pass
nullfor the latter which means that no checksum is available. -
getAndVerifyDistributionRoot - This validates the distribution on disk. When called, it is passed the the location where the distribution was unpacked into. The method should return the effective home directory of the distribution.
In the case of getAndVerifyDistributionRoot it can be very confusing sometimes as to what the distDir is and what should be returned. The easiest is to explain this by looking at how Gradle wrappers are stored. For instance for Gradle 3.0 the distDir might be something like ~/.gradle/wrapper/dists/gradle-3.0-bin/2z3tfybitalx2py5dr8rf2mti/ whereas the return directory would be ~/.gradle/wrapper/dists/gradle-3.0-bin/2z3tfybitalx2py5dr8rf2mti/gradle-3.0.
|
Helper and other protected API methods
-
getProject provides access to the associated Gradle
Projectobject. -
listDirs provides a listing of directories directly below an unpacked distribution. It can also be used for any directory if the intent is to see which child directories are available.
-
getLogger provides access to a simple
stdoutlogger.
Tool Executions Tasks and Execution Specifications
Gradle script authors are quite aware of Exec and /org/gradle/api/tasks/JavaExec.html[JavaExec] tasks as well as the projects extensions exec and javaexec. Implementing tasks or extensions to support specific tools can involve a lot of work. This is where this set of abstract classes come in to simplify the work to a minimum and allowing plugin authors to think about what kind of tool functionality to wrap rather than implementing heaps of boilerplate code.
Wrapping an external tool within a gradle plugin usually have three components:
-
Execution specification
-
Project extension
-
Task type
How to implement these components are described in the following sections.
Execution specifications
Execution specifications are used for configuring the necessary details for runnign an external process. The latter will then be used by a task type of a project extension.
There is currently three abstract classes in the hierachy and the all implement the BaseExecSpec interface.
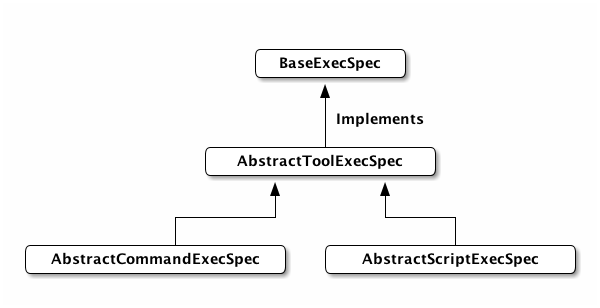
These execution specifications allow to easily present configuration options to your plugin users such as the following:
ignoreExitValue true  (1)
standardOutput System.out  (2)
standardInput System.in    (3)
errorOutput System.err     (4)
workingDir '.' (5)| 1 | Whether the exit value can be ignored. |
| 2 | Where standard output should be sent to. (It is up to a plugin author to decide on behaviour if this value is null). |
| 3 | Where standard input is read from. (It is up to a plugin author to decide on behaviour if this value is null). |
| 4 | Where error output should be sent to. (It is up to a plugin author to decide on behaviour if this value is null). |
| 5 | The working directory during execution. This is a lazy-evaluated value and can be anything that project.file() will be able to process. |
environment = [ foo : 'bar']               (1)
environment foo2 : 'bar2', foo3 : {'bar3'} (2)
environment 'foo4', 'bar4' (3)| 1 | Explictly set the environment in an assignment style, removing any previous environment settings. |
| 2 | Add additional environment settings in the familiar, and gradlesque, map-style. Values of environmental variables have the ability to be lazily-evaluated by the consuming task or projext extension. (As a plugin author you should consider using MapUtils.stringizeValues for your conversions. The tasks described further down do the same). |
| 3 | Add one environment setting as a pair of environment variable and its value. |
If you are familiar with the options on the Exec task, then the above will come as no surprise. It will also present your plugin user with a familiar set of configuration options.
The executable can also be set in the normal way, but if you set the executable in an implementation-specific way in your implementation you might want to prevent the user from setting executable. These specifications also allows you to provide arguments that is specific to the executable and not any associated command. For instance if you were to do git -C /foo commit myfile.txt, then -C /foo would be executable arguments.
executable {'/path/to/exe'}         (1)
exeArgs = [ 'first', 'second' ]     (2)
exeArgs 'third', {'fourth'} (3)| 1 | Set the executable. This is also a lazy-evaluated value and anything that StringUtils.stringize can deal with can be used. In addition ResolvedExecutable instantiations can also be used. |
| 2 | Explictly set the execution arguments in an assignment style, removing any previous execution arguments. |
| 3 | Add additional execution arguments. All of these values are lazily evaluated. |
The above distinction of using execution arguments might seem to be an unnecessary extra at a first read, but in terms of a DSL they allow the use to customise certain behaviour of the excutable without losing focus on the real work the executable is supposed to do. This is similar to running an additional JVM via JavaExec. In this case the `jvmArgs customises the JVM, and not the arguments passed to the class to be executed.
In addition to those the AbstractToolCommandExecSpec will allow you to specify a command that is associated with the executable. For instance in git commit, the command will be commit.
command 'install'         (1)
cmdArgs = [ 'aye', 'bee'] (2)
cmdArgs 'cee', {'dee'} (3)| 1 | Set the command. This can be lazy-evaluated. |
| 2 | Explictly set the command arguments in an assignment style, removing any previous command arguments. |
| 3 | Add additional command arguments. All of these values are lazily evaluated. |
In a similar fashion AbstractScriptExecSpec offers the ability to specify a script name and script arguments.
script 'install.py'       (1)
scriptArgs = ['aye']      (2)
scriptArgs 'cee',{'dee'} (3)| 1 | Set the script. This can be lazy-evaluated. |
| 2 | Explictly set the script arguments in an assignment style, removing any previous script arguments. |
| 3 | Add additional script arguments. All of these values are lazily evaluated. |
In order to implement your own execution specification you need to derive from the appropriate specification.
class GitExecSpec extends AbstractCommandExecSpec {
    GitExecSpec(Project project,Object exe) {
        super(project, new ResolverFactoryRegistry(project))
        setExecutable (exe ?: 'git')
    }
}class PerlScriptExecSpec extends AbstractScriptExecSpec {
PerlScriptExecSpec(Project project,Object exe) {
super(project,new ResolverFactoryRegistry(project))
setExecutable(exe ?: 'perl')
}
}Creating a project extension
ExtensionUtils.addProjectExtension is the key method to use.
Assume for the moment that you have created a execution specification class for wrapping Git and that it looks like the following:
class GitExecSpec extends AbstractCommandExecSpec {
    GitExecSpec(Project project) {
        super(project,new ResolverFactoryRegistry(project))
        setExecutable('git')
    }
}
To add this to the plugin, do
void apply(Project project) {
  ExtensionUtils.addExecProjectExtension('gitexec', project, { Project project ->
      new GitExecSpec(project)
  } as ExecSpecInstantiator<GitExecSpec>) (1)
}| 1 | An instantiator is required to create instances of execution specifications on demand. One simple way is to create a closure an coerce it to a ../api/org/ysb33r/gradle/olifant/ExecSpecInstantiator.html[ExecSpecInstantiator] |
Now it will be possible to do
task gitdiff {
  doLast {
    project.gitexec {
      command 'diff'
    }
  }
}
Creating a task
There is currently four abstract task classes in the hierachy.
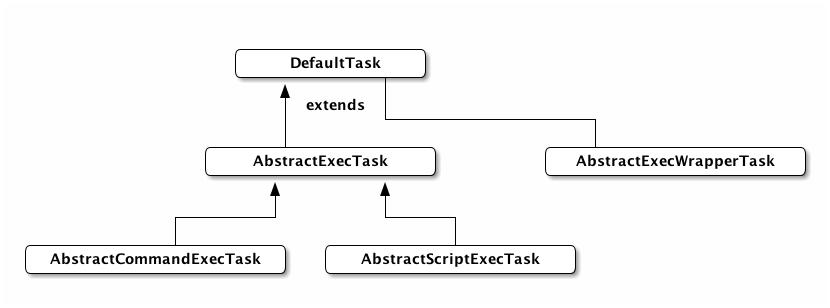
The minimum you will need to do is extend the appropriate class and provide a suitable constructor that can be called by Gradle.
Wrapping a tool with AbstractExecWrapperTask
The AbstractExecWrapperTask is a simplified way of abstract tools into gradlesque tasks. Unlike the other abstraction execution task types mentioned above, it does not expose the full command-line options to the build script author, but rather allows a plugin author to provide suitable functional abstractions. For instance the Packer plugin provides a packerBuild task that wraps around the packer executable. Instead of the command-line options it provides methods to configure the location of the packer.json file` and to set a collections of variables.
This abstract task also relies on suitable extension of AbstractToolExtension by the plugin author. The result is a very flexible DSL. Thiscan be illustrated by the following example which is also a good starting point for any plugin author wanting to abstract a tool in such a way.
Step 1 - Create an execution specification
The details for creating execution specifications has been described earlier. It is suggested to use an AbstractCommandExecSpec as a base class.
@CompileStatic
class MyCmdExecSpec extends AbstractCommandExecSpec {
    MyCmdExecSpec(Project project, ExternalExecutable registry) {
        super(project,registry)
    }
}
Step 2 - Create an extension
The extension class will be attached to both the project and the task for maximum flexibility. This allows for global configuration, with customisation on a task level as needed.
@CompileStatic
class MyExtension extends AbstractToolExtension { (1)

    static final String NAME = 'toolConfig'

    MyExtension(Project project) { (2)
        super(project)
    }

    MyExtension(Task task) {
        super(task,NAME) (3)
    }

}| 1 | Derive from AbstractToolExtension. This will provide methods for setting the executable. |
| 2 | Create a constructor for attaching the extension to a project. |
| 3 | You will also need a constructor for attaching to a task. In this case you will also need to specify the name of the project extension. By convention you should always have the task and project extension by the same name. |
Step 3 - Create the task class
@CompileStatic
class MyWrapperTask extends AbstractExecWrapperTask<MyCmdExecSpec,MyExtension> { (1)

    MyWrapperTask() {
        super()
        myExtension = extensions.create(MyExtension.NAME,MyExtension,this) (2)
    }

    @Override
    protected MyCmdExecSpec createExecSpec() { (3)
        new MyCmdExecSpec(project,getToolExtension().getResolver())
    }

    @Override
    protected MyCmdExecSpec configureExecSpec(MyCmdExecSpec execSpec) { (4)
        execSpec.cmdArgs '--yellow', '--bright'
        execSpec (5)
    }


    @Override
    protected MyExtension getToolExtension() { (6)
        this.myExtension
    }

    private MyExtension myExtension
}| 1 | Your task class must extend AbstractExecWrapperTask and specifiy the types of the associated execution specification and extension. |
| 2 | You need to create an extension class. It is best to also store a reference to the extension within the task as to prevent further lookups. |
| 3 | You need to implement a method which will create an execution specification. |
| 4 | You will also need to implement a method to configure the execution specification according to all of the specifics of the tool that is being wrapped. This is the method that translates task properties into command-line options. |
| 5 | This method always needs to return the execution specification |
| 6 | Finally you also need to implement a method which returns the associated task extension. This is simplified if you have already stored a reference to the extension. |
Step 4 - Apply this via plugin
@CompileStatic
class MyPlugin implements Plugin<Project> {
    void apply(Project project) {
        project.extensions.create(MyExtension.NAME,MyExtension,project) (1)
        project.tasks.create('mycmd',MyWrapperTask) (2)
    }
}| 1 | Create the extension at project level |
| 2 | Create a default instance of your task. |
Use it in the DSL
toolConfig {
    executable path : '/usr/local/bin/mycmd' (1)
}

mycmd {
    toolConfig {
        executable path : '/opt/local/bin/mycmd' (2)
    }
}| 1 | Set the default executable at project level. |
| 2 | You can also customise it a task level. |
Task-first config
The best idiom to implement is to retrieve task extension data first, before project extension data. Assuming that you need to call getResolvableExecutable() (the same applies to any method on your extension) is to do the following in your task code:
getToolExtension().getResolvableExecutable()This will provide access to the getResolvableExecutable() method on the extension which is actually implemented along the lines of
ResolvableExecutable exe = some_internal_method()
if(exe == null && getTask() != null) { (1)
  exe = getProjectExtension().getResolvableExecutable() (2)
}
return exe (3)| 1 | getTask is a protected method which return an associated task or null if the extension is attached to a project. |
| 2 | getProjectExtension is another protected method which always returns the project extension irrespective of whether the current extension is attached to a project or a task. |
| 3 | At this point your implementation can decide to return null or throw an exception. |
You can simplify some of this work by using the getValue and getValueByMethod methods in AbstractToolExtension. Consider for a moment that you have a method String getMode() in your extension class. You can then do
(String)(getToolExtension().getValueByMethod('getMode'))This uses reflection internally to obtain the value and might not necessarily be the best solution for your situation.
| Due to the fact that Grolifant maintains JDK7 compatibility, Java method references are not supported at present. You may of course decide to implement your own simplification to method references if your plugin does not need to care about JDK7. |
Adding version-based resolving
Version-based resolving is handled through the ResolveExecutableByVersion class and requires an implementation of a distribution installer. You can
Assumuing that you have such an implementation called MyInstaller you can proceed to add the logic to your extension
@CompileStatic
class MyExtension extends AbstractToolExtension { (1)

    static final String NAME = 'toolConfig'

    MyExtension(Project project) { (2)
        super(project)
        addVersionResolver(project)
    }

    MyExtension(Task task) {
        super(task,NAME) (3)
        addVersionResolver(task.project)
    }

    private void addVersionResolver(Project project) {

        ResolveExecutableByVersion.DownloaderFactory downloaderFactory = { (4)
            Map<String, Object> options, String version,Project p -> (5)
                new MyInstaller(version,p)
            } as ResolveExecutableByVersion.DownloaderFactory

        ResolveExecutableByVersion.DownloadedExecutable resolver = { MyInstaller installer -> (6)
                new File(installer.getDistributionRoot(),'test.sh') (7)
            } as ResolveExecutableByVersion.DownloadedExecutable

        getResolverFactoryRegistry().registerExecutableKeyActions(
            new ResolveExecutableByVersion(project,downloaderFactory,resolver) (8)
        )
    }
}| 1 | Derive from AbstractToolExtension. This will provide methods for setting the executable. |
| 2 | Create a constructor for attaching the extension to a project. |
| 3 | You will also need a constructor for attaching to a task. In this case you will also need to specify the name of the project extension. By convention you should always have the task and project extension by the same name. |
| 4 | First step is to implement the functional interface of ResolveExecutableByVersion.DownloadFactory. Use it to construct an instance of your downlader (MyInstaller) in this example. |
| 5 | You can use various means to create this including JDK8 lambdas, but for compatibility with JDK7, the example uses a coerced closure. |
| 6 | Second step is to crimplement the ResolveExecutableByVersion.DownloadedExecutable interface. Its purpose is to download the corect version and resolve the path to the executable. |
| 7 | Once again a coerced closure is used in the example, but if you use Kotlin or Java you can use appropriate means to implement the interface. |
| 8 | Register the factory and you’ll be able to use version key when specifying the executable. |
You can now use version above and beyond the default path and search keys.
toolConfig {
    executable version : '0.2'
}
Operating System
Many plugin developers are familiar with the OperatingSystem internal API in Gradle. Unfortunately this remains an internal API and is subject to change.
Grolifant offers a similar public API with a small number of API differences:
-
No
getFamilyNameandgetNativePrefixmethods. (A scan of the Gradle3.2.1codebase seem to yield to usage either). -
No public static fields called
WINDOWS,MACOSXetc. These are now a static field calledINSTANCEon each of the specific operating system implementations. -
getSharedLibrarySuffixandgetSharedLibraryNamehave been added. -
Support for NetBSD.
Example
OperatingSystem os = OperatingSystem.current() (1)
File findExe = os.findInPath('bash')| 1 | Use current() to the operating system the code is being executed upon. |
Operating system detection
The logic in 0.4 to determine an operating system is
static OperatingSystem current() {
    if (OS_NAME.contains("windows")) {
        return Windows.INSTANCE
    } else if (OS_NAME.contains("mac os x") || OS_NAME.contains("darwin") || OS_NAME.contains("osx")) {
        return MacOsX.INSTANCE
    } else if (OS_NAME.contains("linux")) {
        return Linux.INSTANCE
    } else if (OS_NAME.contains("freebsd")) {
        return FreeBSD.INSTANCE
    } else if (OS_NAME.contains("sunos") || OS_NAME.contains("solaris")) {
        return Solaris.INSTANCE
    } else if (OS_NAME.contains("netbsd")) {
        return NetBSD.INSTANCE
    } else {
        // Not strictly true, but a good guess
        return GenericUnix.INSTANCE
    }
}
Contributing fixes
Found a bug or need a method? Please raise an issue and preferably provide a pull request with features implemented for all supported operating systems.
String Utilities
Converting objects to strings
Use the stringize method to convert nearly anything to a string or a collection of strings. Closures are evaluated and the results are then converted to strings.
StringUtils.stringize( 'foo' )           == 'foo'
StringUtils.stringize( new File('foo') ) == 'foo'
StringUtils.stringize( {'foo'} )         == 'foo'

StringUtils.stringize(['foo1',new File('foo2'),{'foo3'}]) == ['foo1','foo2','foo3']
URI Utilities
Converting objects to URIs
Use the urize method to convert nearly anything to a URI. If objects that have toURI() methods those methods will be called, otherwise objects that are convertible to strings, will effectively call toString().toURI(). Closures will be evaluated and the results are then converted to URIs.
UriUtils.urize( 'ftp://foo/bar' )        == new URI('ftp://foo/bar')
UriUtils.urize( new File('/foo.bar') )   == new File('/foo.bar').toURI()
UriUtils.urize( {'ftp://foo/bar'} )      == new URI('ftp://foo/bar')
UriUtils.urize( {new File('/foo.bar')} ) == new File('/foo.bar').toURI()
What’s in a name
Grolifant is a concatenation of Gr for Gradle and olifant, which is the Afrikaans word for elephant. The latter is of course the main part of the current Gradle logo.